

How to reduce noise in Photoshop
There are many different methods that can be employed to reduce the amount of noise in your images but I have always found it easier to reduce noise in Photoshop. The debate on How to reduce noise in Photoshop and best software for removing noise will always be there as new and existing software continues to develop and become more sophisticated.
Photoshop is just one of many excellent packages out there and I have tried most of them but I always end up going back to adobe. I think it is mainly because I am just used to using it so much and find it frustrating using other packages and therefore I have focused this around Photoshop as these are the methods I use on my own photographs.
Adobe Camera Raw (ACR) in Photoshop and Lightroom have very capable noise reduction software built in but there are some other great options out there which I will also compare and explain why I use them. What I like about these software packages is that they can be used directly as a plugin from within both Photoshop and Lightroom or used as stand alone if preferred.
Over the years as software has improved along with the quality of images modern day cameras produce I have had to change and modify my processing workflow with regards to removing noise. Before I outline the methods I use and what I feel is the best I must stress I am not affiliated with any of the software outline here in any way and all packages have been purchased at full price with my own money.
My opinions and thoughts are based on real trials and usage on my own images over long periods of time and in some cases even years.
How to reduce noise using Adobe Camera Raw within Photoshop.
There are several tools within ACR that can both affect and control noise and these can be found in the “Details” tab. Before you do this I would suggest creating a duplicate layer so any alterations are none destructive to the original image. (Shortcut Cmd & J on Mac)
Adobe Camera Raw can be accessed from the Filter Menu > Camera Raw Filter. Once opened select Detail icon from the right panel.

This suite of tools is grouped into two sub categories with each set having their own control sliders, Sharpening and Noise Reduction.
Noise reduction is split into two further groups
- Luminance – Additional 2 Sliders for Luminance Detail & Luminance Contrast
- Colour – Additional 2 Sliders for Colour Detail and Colour Smoothness
Note: These sliders are the same in Lightroom and function in exactly the same way.
Sharpening Tool
One very important note to understand here and that is that sharpening adds noise, so it is important to set correctly and not over cook it. This group is made up of 4 variable sliders
- Amount: This controls the overall amount of the following 3 variables when sharping is applied.
- Radius: Controls the size (radius) of the sharpening effect around the edges you are sharpening.
- Detail: Controls the sharpening algorithm used. A value of 0 uses Unsharp Mask where 100 uses Deconvolution. Any values in between uses a blend between the two algorithms.
- Masking: Creates a mask that limits sharpening to areas of details when set to a value greater than one.
Luminance Noise Reduction
Of all the sliders within the details tab I find this set of Luminance Sliders the most critical in reducing noise and where I spend most of the time tweaking to find the best values to give the required result of reduction.
- Luminance: This controls the overall amount of the following 2 variables when noise reduction is applied.
- Luminance Detail: This slider is very similar to masking in the sharpening tool where it controls the illuminance level of pixels that should not have any noise reduction applied. Setting a smaller value will produce less noise reduction (Slider to the left) where as a higher value will increase the amount noise reduction (Slider to the right).
- Luminance Contrast: This will help to recover contrast lost to the noise reduction applied above and should be increased sparingly to recover as much as possible without increasing noise and artificial artefacts in your image.
Colour Noise Reduction
I rarely have to use these sliders unless I really push my ISO in low light situations with plenty of colour and in most cases leave them at default.
- Colour: Controls the overall Colour Noise reduction of the following two 2 sliders in the same way as Luminance above for Luminance Noise Reduction.
- Colour Detail: This slider is very similar to masking in the sharpening tool and Luminance Detail where it controls the colour of pixels that should not have any noise reduction applied. You can reduce this value to try and minimise any colour fringing around bright objects but I prefer to use other methods to combat this. High values will remove too much colour from around the edges and I find it gives me too much of a halo effect in many cases.
- Colour Smoothness: This slider smooths out colour over large areas but can create a blotchy effect if reduced too low. I have used this to smooth out colour in nightscapes such as Astro Glow but it can dull the colour around finer detail and lose a little tonal contrast. Like the above slider I rarely change this and find the default value the best.
Workflow for reducing noise using Photoshop and Lightroom
- Set radius to a minimum of 0.5
- Set Detail to a Maximum of 100 for Deconvolution sharpening.
- Set Masking to a minimum of 0
- Adjust Amount slider until you find the best result.
- Set Luminance slider to a very high value to help visualise the effects of the luminance detail and contrast sliders.
- Adjust Luminance Detail slider to find optimum detail level
- Adjust Luminance Contrast slider to find best contrast level
- Reduce Luminance Slider to find overall optimum balance and level.
The same process can be followed for colour noise reduction starting with setting the Colour slider high and balancing the final two sliders but as previously mentioned usually I leave at default levels unless required.
The benefit of using this method is that there are no additional costs involved as it comes part of Photoshop and Lightroom software packages. One of the main reasons I prefer to carry out noise reduction in photoshop is that I can be very selective on where I want to reduce noise within an image by using luminosity masks. This is an extremely powerful method of selection masking and what I always use to reduce noise in my Nightscape images. A further benefit to using Photoshop is using ACR on duplicate layers where the overall effect can easily be controlled by reducing the opacity to get the desired level you feel comfortable with.
Another big advantage to using this method in Lightroom is the ability to batch process your images. This is extremely useful if you have taken a series of images using the same camera settings like continuous burst mode of maybe a bird taking flight. In lightroom you can adjust these settings the same as in Photoshop but with the bonus of being able to copy these settings to all the other images allowing batch processing. This can seriously reduce your processing time if you have many images to process and when I use the functions in Lightroom.
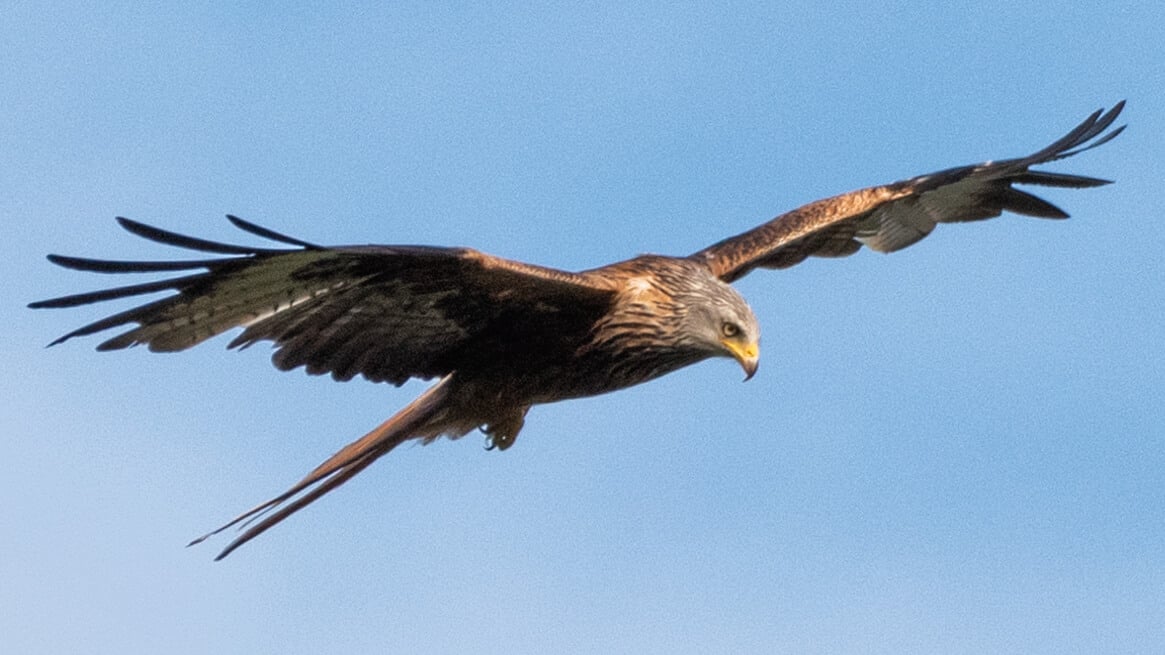
To show results and do a fair comparison between methods I have used a single image of a Red Kite I took with a relatively high ISO. It is worth noting this was taken with a full frame camera so the noise is slightly lower than what you would expect from a crop sensor.
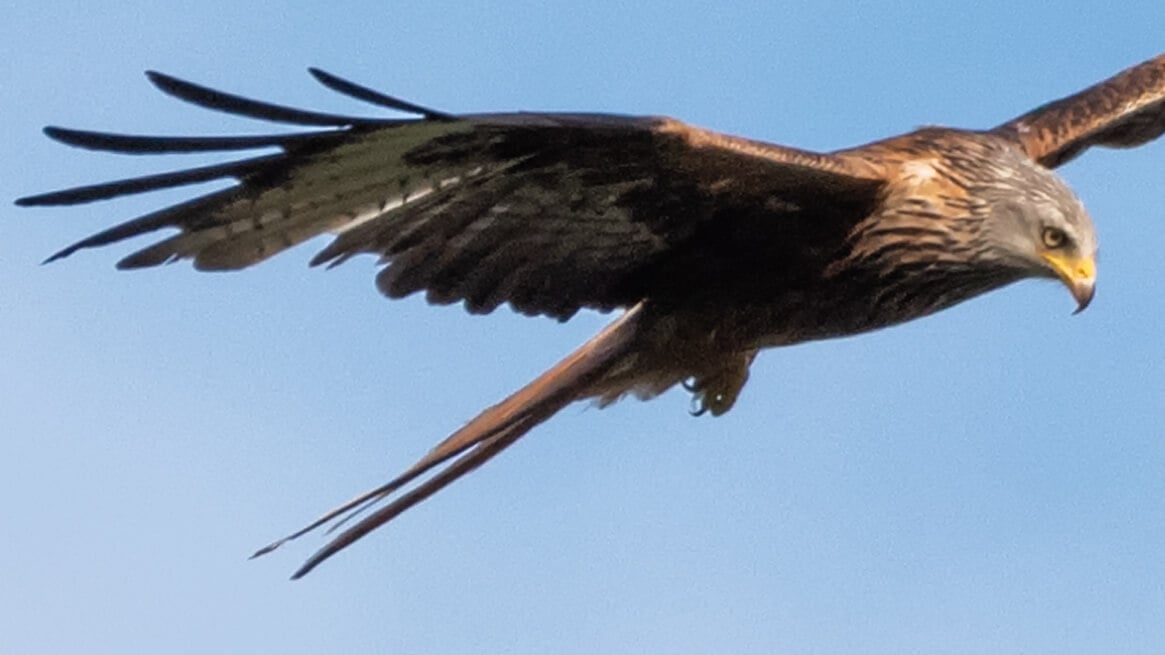
This is a the resulting image using ACR in Photoshop to remove noise.

You can see that the noise has been reduced in the sky but has also softened the detail in the bird. I could get round this by masking and using different levels for the bird and clean up the overall image but I wanted to show the effect straight out of ACR for a fair comparison.
I have used this method for years but it is time consuming balancing all the levels to give the optimum finished level of noise reduction and replaced this noise reduction method with the following method a fair few years ago.
Nik Collection Dfine now by DXO
I have been processing my images using this method for over the last 4 years and is probably the method I use most of all and that is Nik Collection Dfine.
This tool was originally created by Nik Software and was a part of the Nik Collection processing suite which was later acquired by Google in 2012. When Google purchase the software, it was offered free for download but unfortunately google stopped developing it which meant as Photoshop developed the Nik Collection tools started to have issues which would cause the application to hang or crash. Photographers like myself who absolutely loved this suite of tools found workarounds to enable them to run the tools within Photoshop and Lightroom but every now and again it would have issues.
In 2017 DXO purchased the Nik Collection tools and later released Nik Collection 2 and now continue to develop and support the tools. There have been mixed responses from the community because you now have to purchase it from DXO and these tools are very similar to when they were free. I will say that DXO now support the tools and have ironed out all of the issues so it is compatible with the latest version of Photoshop and Lightroom and for me it was well worth purchasing as they still are a very important part of my workflow even though I now use them less than I used to.
You can still download the original free version if you have a search round on the internet but you will have compatible issues if you try to use it with latest Adobe products.
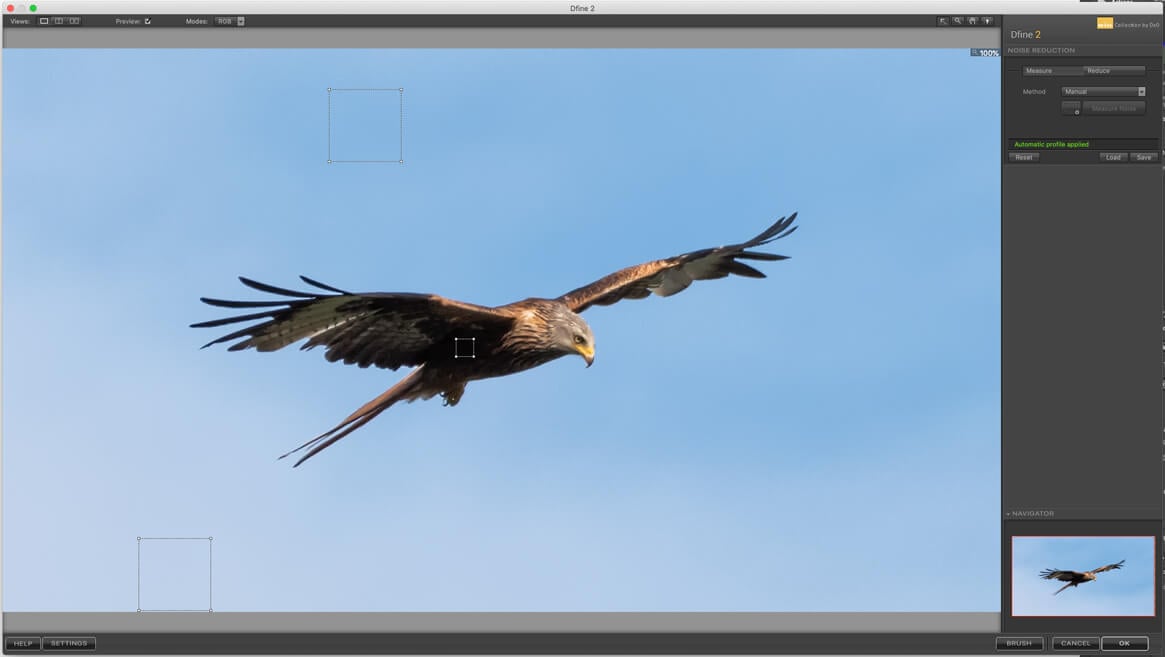
So Dfine how good is it and how easy is it to use?
The tool itself is very easy to use and in most cases I switch over to manual selection and draw a box around the area in the image that has noise such as sky in the image. This will then calculate the values required to best remove the noise. You can now adjust and dial in key parameters to tweak the image if you feel it needs further correct as required. Although I find this tool excellent for removing noise you need to bear in mind that the image will lose detail and become softer. Again like the Photoshop ACR method you can reduce the noise on a separate layer and then use masking techniques to leave areas where you want to retain detail. Sometimes I will duplicate layers and mask out everything other than the detail I want to preserve and bring down the opacity until I am happy with the level and noise and sharpness of the detail. Or I can add sharpening to these selected areas to bring back some of the sharpness of the detail and is why I found it so powerful to use in photoshop.
Dfine does have area selection tools called control points where you can chose to add or not the noise reduction tool, you can also alter both the size of the area and the opacity but I prefer to do this in Photoshop where I can be much more accurate with my selection.
The latest suite now claims to use profile data for your specific camera to maximise the noise reduction claiming it knows exactly how the noise was created by your camera. To keep a level playing field for cross testing I used the automatic mode to show how good it is straight out of the software.
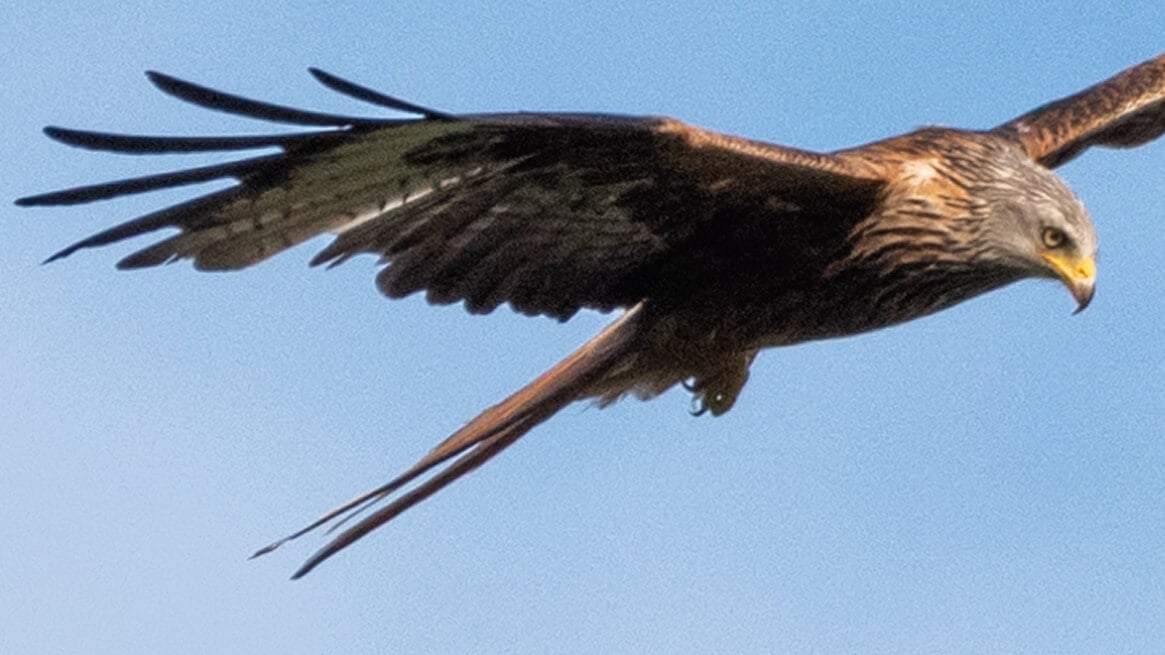
You can see from the image above that there is some softening as to be expected and noise in the background reduced but still present. Here is a picture comparing the Photoshop ACR method against Dfine and this highlights how soft the photoshop version is but noise is less in the ACR version.

I did reduced the Luminance slider in the Photoshop version for a quick test and they came out very close with Dfine just edging it for me. The Nik Collection 2 suite costs £125 and for this you do get 7 Plugins & DxO PhotoLab 2 (Essential) which I personally don’t think is a bad deal at all especially as you get ColourEFEX Pro plugin which I absolutely love.
They are currently offering a 30 day free trial so it is well worth downloading and trialing for yourself to see what you think. Here is a link to their website Nik Collection 2
Denoise AI by Topaz Labs
Last but not least we have Denoise AI by Topaz Labs which claims to be the first AI Noise Reduction tool on the market. Topaz developed this new Denoise AI by feeding their algorithm with millions of noisy and clear images until the artificial intelligence actually learnt what noise was in an image and how best to remove it.
Sounds crazy right and yes I was very sceptical when I read this and thought just another gimmick to sell to the naive photographer. It says that Denoise AI examines the whole image and holistically determines the difference between detail and noise in that photo and recovers surprising amounts of detail from the noise.
So does it do what it says on the tin? Lets dive in and test it with the same image.
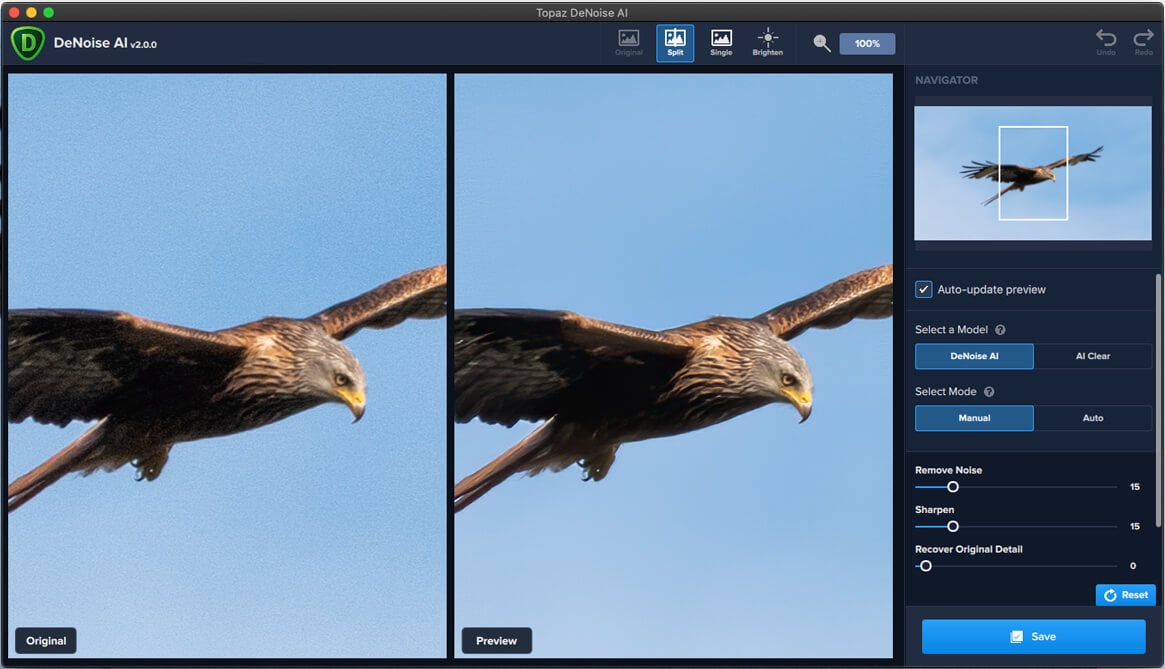
The settings are quite limited with 2 models to select for noise reduction either DeNoise AI or AI Clear. They say that DeNoise AI can retain more detail but I found AI Clear to work best on this particular image. First I tried the DeNoise AI in Auto mode and straight away the results were very impressive.

Next I tried the AI Clear model and compared it the DeNoise model again these have not been fine tuned in manual mode but purely just letting the software make all its own decisions in Auto mode.

AI Clear did still have a little noise present compared to the DeNoise model but certainly retained a little more detail. This was surprising as Topaz say that DeNoise will retain more detail which I didn’t see but AI Clear on auto did have noise appearing around the edge of the wings and head.
For one final test I switch into Manual Mode and selected remove noise Medium and Enhance Sharpness High leaving Recover Detail at zero and compared it to the DeNoise AI image.

The results from the Topaz DeNoise AI plugin surpass anything I have ever seen or tested before and I was totally blown away by how good it is. I was very sceptical with the claims Topaz are making but when you compare the original image to the final result in manual mode I can truly say this software is pretty revolutionary. Remember there is further tweaking available in this tool but I tried to keep it as automatic as possible and the whole process takes less than 30 seconds to complete!
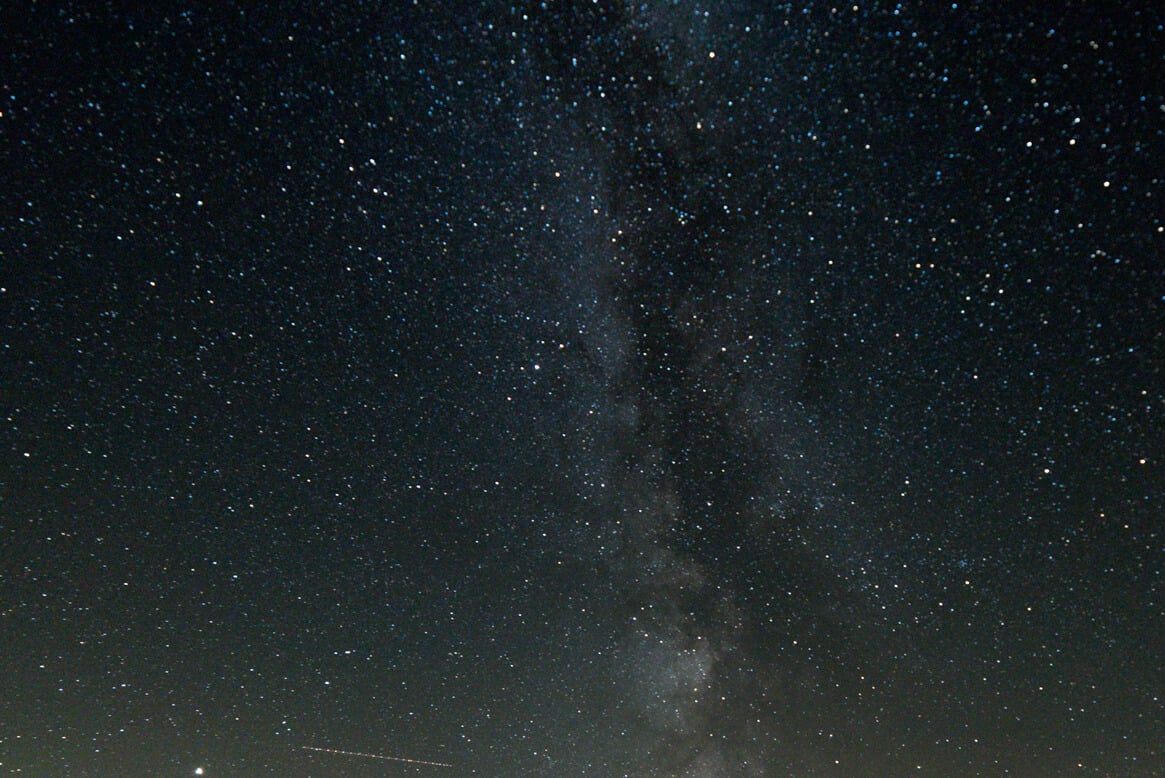
Finally as one last test I took a raw night sky image and zoomed in by 60% to carry out a very quick test to see how DeNoise AI would handle noise and stars in the night sky. Again very impressive and probably a little more difficult for you to see but I was very impressed with the results.

Topaz DeNoise AI can be purchased as a bundle for $79.99 or as parts as the Utility Bundle for $249.99 which consists of three other utility plugins. Just like Nik Collection you can use these tools also in Lightroom or as standalone if you do not have either of the adobe packages.
Currently Topaz are offering a 30 day free trial of their tools and I highly recommend trying DeNoise out along with Gigapixel AI which you can obtain from their website Topaz DeNoise AI
My overall Conclusion
Well if you have made it this far you can probably guess that Topaz DeNoise AI in my opinion is currently by far the easiest and best method to remove noise from your photographs out there. I have been totally blown away by how good this software is and I think it is worth every penny if you regularly push your ISO.
Photoshop ACR is free in that it is already part of Lightroom and Photoshop and is a great option if you don’t need a tool to remove noise regularly. By using selective luminosity masking you can remove all sorts of noise but it is a little cumbersome but shouldn’t be over looked. It is certainly a great alternative if you are more advanced in using Photoshop and Lightroom. With the age of Artificial Intelligence well and truly here I think it will only be a matter of time before Adobe build this into their software for edge recognition for selective tools and artefact removal.
I do have a soft spot for Nik Collection Dfine due to its great Colour EFEX pro but if I purely wanted to use Dfine for removal then I would choose Topaz DeNoise AI every time.
I hope you find this useful for removing noise in Photoshop in the future and please feel free to leave a comment letting me know what you think or if you have any other alternatives to the software listed here.
March 5, 2020 @ 6:24 am
Very informative. And the effect is amazing, based on the before and after photos! Thank you for sharing.
March 5, 2020 @ 6:28 pm
Hi Belinda,
Thanks for your comments they are very much appreciated and I am glad you found it informative!
April 5, 2020 @ 1:36 pm
As part of my current workflow, I generally apply some denoise in either LR or ACR… Does Topaz Denoise AI work better if going straight from the raw file, or making initial adjustments in ACR?
April 5, 2020 @ 3:18 pm
Hi JD,
I always make my initial adjustments such as white balance and general tonal adjustments in Lightroom first before I transfer to photoshop, this is just my preferred way and my personal workflow. However I don’t carry out any sharpening or noise reduction in Lightroom as I like to have more selective control in Photoshop. I just find it easier to target key areas I want and fine tune rather than using the selection tools in Lightroom and find it gives me better realistic results.
You can use Topaz Denoise from within Lightroom if you prefer and not use photoshop at all or even use it as stand alone software you don’t need either PS or LR for it to work.
I now do not apply any Denoise in either PS or LR before I used Topaz DeNoise as it is much quicker and in my opinion performs better. As I stated in the post similar results can be achieved using various masks and sharpening but if you have the Topaz software it makes much more sense to use it.
As for work better on RAW files? I do not see any difference between using the software on a .NEF raw file or a converted .PSD ProPhoto RGB at 16 bits in Photoshop and this is the way I always use it. One final thing is that I do like to run the software after I have used anything like Dehaze or ColourFX Pro tools simply because this may introduce a little noise so I always make these adjustments first if I want to use them.